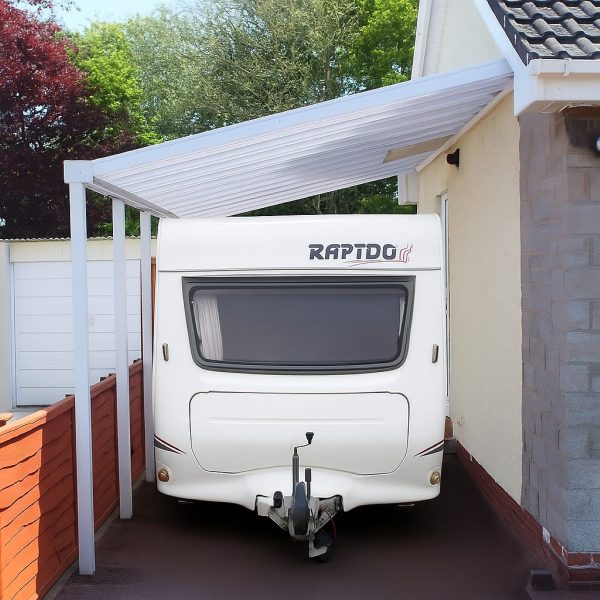




Installing a polycarbonate roof kit with aluminium rafter supported glazing bars is one of the most effective ways to create a strong, weatherproof, and attractive lean-to roof, canopy, carport, veranda, conservatory roof, or garden room. Omegabuild’s aluminium rafter supported bars provide superior strength and durability while ensuring your polycarbonate roofing sheets remain securely fixed and protected against the elements.
This guide explains the installation process for a typical lean-to roof kit using Omegabuild’s aluminium glazing bar system. The instructions are based on the manufacturer’s fitting guide.
Aluminium Rafter Bar Fitting Guide
Why Choose Aluminium Rafter Supported Glazing Bars?
Aluminium rafter supported glazing bars are designed to sit directly on structural timber rafters, providing excellent support for polycarbonate roofing sheets. Compared with plastic systems, aluminium glazing bars offer:
- Greater structural strength
- Longer service life
- Improved weather resistance
- Professional appearance
- Secure fixing for multiwall polycarbonate sheets
- Suitable for lean-to roofs, canopies, pergolas, verandas, and conservatory roofs
Browse our full range of aluminium glazing bars here:
👉 Aluminium Rafter Supported Glazing Bars
https://www.omegabuild.com/product-category/glazed-roof-bars-and-components/aluminium-rafter-supported-glazing-bars
Materials Required
Before installation, ensure you have:
- Aluminium rafter supported glazing bars
- Polycarbonate roofing sheets
- End caps
- Glazing gaskets
- Retaining brackets
- Ridge components (if applicable)
- Timber rafters
- Appropriate fixings
- Silicone sealant
- Measuring tape
- Saw suitable for aluminium
- Drill and screwdriver
You can purchase high-quality polycarbonate roofing sheets directly from Omegabuild:
👉 Polycarbonate Roofing Sheets
https://www.omegabuild.com/product-category/polycarbonate-sheets/polycarbonate-roofing-sheets
Step 1 – Install the Glazing Retaining Brackets
Begin by fixing the glazing retaining brackets onto the timber rafters.
The fitting guide recommends installing two glazing retaining brackets per glazing panel. The brackets should be positioned accurately to suit the width of your polycarbonate sheet while allowing for sufficient overhang into the gutter system.
Important Tips
- Check your polycarbonate sheet dimensions before fixing.
- Allow adequate sheet overhang into the gutter.
- Ensure brackets are square and aligned along each rafter.
Step 2 – Fit the Base Glazing Gasket
Cut the base glazing gasket to the required length.
The gasket should extend sufficiently into the gutter area and sit securely within the glazing bar profile. Certain installations may require trimming of the gasket foot to suit the application. The fitting guide also notes that a high-side EPDM gasket can be used where appropriate.
Benefits of Proper Gasket Installation
- Prevents water ingress
- Improves weatherproofing
- Reduces draughts
- Protects polycarbonate roofing sheets
Step 3 – Prepare the Roof Structure
Before fitting the glazing bars and sheets:
- Confirm timber rafters are level and evenly spaced.
- Verify the roof pitch is suitable for polycarbonate roofing.
- Ensure all structural timbers are securely fixed.
Correct roof preparation is essential for the long-term performance of any lean-to roof kit.
Step 4 – Position the Polycarbonate Roofing Sheets
Place the polycarbonate sheets onto the glazing bars.
Apply a thin bead of silicone sealant along the upper closure section if required. Ensure each sheet sits correctly within the glazing retaining brackets and that adequate expansion gaps are maintained.
Best Practice for Polycarbonate Roofing Sheets
- Install UV-protected side facing upwards.
- Keep protective film in place until completion.
- Seal open ends using the appropriate tapes and closures.
- Allow for thermal expansion.
Step 5 – Fit the Glazing Gaskets and End Caps
Once the sheets are positioned:
- Cut glazing gaskets to length.
- Install the gaskets evenly along the glazing bars.
- Position the end caps.
- Fix through the pre-drilled holes.
- Clip the cover caps into place.
The Omegabuild aluminium glazing bar system accommodates several gasket options including standard EPDM and high-side EPDM configurations.
This stage locks the polycarbonate sheet securely into position while maintaining a watertight seal.
Step 6 – Install Ridge Components (Where Applicable)
For pitched roofs incorporating a ridge:
- Cut the ridge base to the required length.
- Fix the ridge base securely.
- Prepare the ridge top according to the roof pitch.
- Apply silicone where specified.
- Fit the ridge cap and associated flashings.
The fitting guide highlights the importance of ensuring the ridge top is not pushed excessively into the base, allowing sufficient room for final cap installation.
Step 7 – Fit Main and Wall Bars
Cut the aluminium glazing bars to the required length.
Secure the bars through the centre channel into the timber rafters at approximately 300mm intervals. When fitting wall bars, ensure adequate clearance is maintained between the fixing screws and the glazing material.
Why Aluminium Glazing Bars Are Ideal
Omegabuild aluminium glazing bars provide:
- Excellent load-bearing capacity
- Long-term corrosion resistance
- Strong support for 16mm, 25mm and 35mm polycarbonate sheets
- Professional finish for lean-to roofing systems
Step 8 – Install Hip Bars and Jack Bars (If Required)
For Victorian or Edwardian style roof designs:
- Install jack bars first.
- Fit glazing sheets as normal.
- Complete installation of hip bars and hip top caps last.
The fitting guide advises that cover caps are fitted underneath the hip section to achieve a secure weatherproof finish.
Step 9 – Fit the Cover Caps
The final stage is fitting the aluminium cover caps.
Position one side first and then roll the cap over until it snaps firmly into place. This secures the polycarbonate roofing sheet and provides a neat, professional appearance.
Common Installation Mistakes to Avoid
When installing a polycarbonate roof kit, avoid:
- Insufficient roof pitch
- Incorrect polycarbonate sheet orientation
- Failing to allow for thermal expansion
- Over-tightening fixings
- Inadequate sheet overhang into gutters
- Misaligned aluminium glazing bars
- Missing end closures or sealing tapes
Why Buy Polycarbonate Roofing Products from Omegabuild?
Omegabuild supplies premium roofing products for domestic and commercial projects, including:
- Polycarbonate roofing sheets
- Aluminium glazing bars
- Lean-to roof kits
- Conservatory roof components
- Veranda roofing systems
- Carport roof kits
- Canopy roofing materials
Our aluminium rafter supported glazing bar systems are engineered to provide reliable support for polycarbonate roofs while delivering a clean, professional finish.
Shop Online
Aluminium Glazing Bars:
https://www.omegabuild.com/product-category/glazed-roof-bars-and-components/aluminium-rafter-supported-glazing-bars
Polycarbonate Roofing Sheets:
https://www.omegabuild.com/product-category/polycarbonate-sheets/polycarbonate-roofing-sheets
Frequently Asked Questions
What are aluminium glazing bars used for?
Aluminium glazing bars are used to secure and support polycarbonate roofing sheets and glass panels in lean-to roofs, verandas, canopies, conservatories, and carports.
Can I fit a polycarbonate roof kit myself?
Yes. Many DIY enthusiasts successfully install polycarbonate roof kits using aluminium glazing bars, provided the roof structure is correctly prepared and installation instructions are followed.
What thickness polycarbonate roofing sheets should I use?
The required thickness depends on rafter spacing, roof size, and local weather conditions. Popular options include 16mm, 25mm, and 35mm multiwall polycarbonate sheets.
Are aluminium glazing bars better than PVC glazing bars?
Aluminium glazing bars generally provide greater strength, durability, and lifespan, making them ideal for larger roofs and long-term installations.
What is the best roof pitch for polycarbonate roofing sheets?
Most polycarbonate roofing systems perform best with a minimum roof pitch that encourages efficient rainwater runoff. Always check the recommendations for your specific roofing sheet and roof kit design.