


How to Build a Timber Frame Carport or Canopy
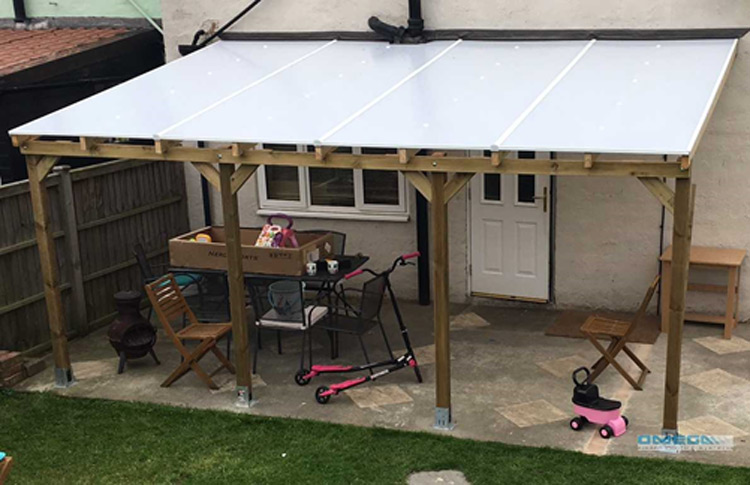
So, how do you build a timber frame carport?
CHOOSING YOUR POLYCARBONATE CANOPY SHEET
- Structured 10mm polycarbonate sheet is the cheapest material for an open-sided carport or pergola.
- If you are building a large structure you could also consider 16mm or thicker.
- For a conservatory, choose the thickest you can afford giving extra insulation.
- If you use the widest sheet you can comfortably handle, this will reduce the number of glazing bars required keeping costs down. However, it is very easy to underestimate the size and difficulty of handling sheets, particularly in windy conditions. It is important to have enough cross purlins and rafters to strengthened the timber canopy structure.
SUPPORT
We recommend rafters at 600mm or 700mm centres depending on the width of sheet used (maximum width 1830mm or 2100mm). This will support the sheet on both edges and twice in between. A F Section is used to start and finish the carport and glazing bars used to connect the sheets. Fixing buttons are used on the support rafters between the glazing bars. Decide which sheet you would like then check available widths. Ideally, we would suggest your Timber to be at 700mm centres (10mm Clear, Bronze or opal) or up to 1050mm centres (all other polycarbonate).
CONVENIENT LEAN-TO CANOPY KITS
Omegabuild can supply a timber supported lean to kit with the components you require. It is based on 1050mm sheets and can be supplied with 10 twinwall,16 triplewall or 25mm polycarbonate sheets. To see the range of sizes we offer have a look at our website for lean to conservatory kits.
Lean-to kits - If you would prefer to not use timber rafters we also have a range of self-supported polycarbonate lean to roof kits. To find out more have a look on our diy conservatory roof kits on our website and wall canopy products.
If you would like to have a complete aluminium kit with legs and guttering Omega offers their Smart canopy and carport system.
REPLACING CORRUGATED SHEETS
PVCu corrugated sheets are normally fixed to purlins. Screw down bars do not work on purlins. Though not recommended by manufacturers, snap-down bars can be used to cross purlins, Timber rafters would be better, then any bar can be used and with more fixings. The important point here is the number of fixings points holding your roof down. E.g. a 3m projection with purlins may only have 4 fixings points per bar, imagine a sudden gust of wind underneath that. Better too many fixings than not enough. UPVC corrugated roofing sheets are available on our website. Read about the usage of polycarbonate roofing sheets here...
PITCH
The manufacturers minimum recommended pitch is 5°, to cover adequate drainage, this is a fall of 265mm over 3000mm. This is a minimum, we would recommend a fall of 500mm.
TAPE
Both ends of the polycarbonate sheet should be taped to stop dust and insects from entering the flutes. Breather tape should be used at the bottom allowing air as it expands and contracts to exit and enter the flutes. Omegabuild can supply the sheets trimmed and taped.
Please visit our website for photographs and sheet comparisons.
GLOSSARY
Rafter
A roof supporting beam that runs from top to bottom down the slope.
Purlin
A roof supporting beam that runs horizontally, sometimes supporting rafters or
running between them.
Glazing bar
Joins two sheets of polycarbonate together.
Self supporting
Acts as a rafter as well, needing no additional support.
Timber supported
Needs to sit on a timber support.
The Snap-down bar has an aluminium base which is screwed onto the timber and has a plastic snap-on capping Although it is not recommended this bar can be used crossing purlins, particularly when replacing corrugated sheet. Please ensure you check the Omegabuild fitting guides for the maximum distances allowed between cross purlins. If in doubt place timber noggins between the cross purlins to create a virtual rafter.
The Screw down aluminium bar has a rubber base and can only be used on a complete rafter. The capping is all aluminium with an aluminium screw cover cap and it is screwed into the rafter. This is the stronger and more professional method suitable for all thicknesses of polycarbonate and even single glazed glass.
Edge bar
A bar used on the sides to finish off with polycarbonate on one side only.
Sometimes an adapted main bar and not always available from every manufacturer.
Upvc Edge trim /F section
Converts the main snap down bar into an edge bar.
F section
Used instead of an edge bar. Useful with its leg that can be used down or up if against a wall. Plastic or aluminium depending on thickness.
Aluminium Tape
Put on the top edge of the polycarbonate sheet to prevent water ingress.
Breather tape
Put on the bottom of the sheet allowing air in and out of the flutes as it expands and contracts while keeping dust and insects out.
Sheet Closure
Plastic U section with a drip that protects the breather tape and stops water running up the underside of the sheet.
Fixing Buttons
This is a screw fixing with a upvc gasketed cover (shaped like a mushroom). They are used to fasten the polycarbonate onto rafters or cross purlins to prevent wind lift. They are really useful with larger and wider sheets.
Matting
Try Gymmatsplus if your are looking for rubber flooring, their rubber gym mats are affordable and giood quality.
Updated March 2023.
Next Guide - How to fit secondary glazing panel with magnetic tape >

 Dear
Omegabuild, thank you very much for your delivery - swift
service - and good customer care -
Dear
Omegabuild, thank you very much for your delivery - swift
service - and good customer care -  © Copyright 2007 - 2024